---
stage: none
group: unassigned
info: 任何拥有至少Maintainer角色的用户都可以合并对此内容的更新。详情请参阅 https://docs.gitlab.com/development/development_processes/#development-guidelines-review。
title: GraphQL
---

## 开始使用

### 有用资源

**通用资源**:

- [📚 官方GraphQL介绍](https://graphql.org/learn/)
- [📚 官方Apollo介绍](https://www.apollographql.com/tutorials/fullstack-quickstart/01-introduction)

**GitLab中的GraphQL**:

<!-- vale gitlab_base.Spelling = NO -->

- <i class="fa fa-youtube-play youtube" aria-hidden="true"></i> [GitLab未过滤的GraphQL播放列表](https://www.youtube.com/watch?v=wHPKZBDMfxE&list=PL05JrBw4t0KpcjeHjaRMB7IGB2oDWyJzv)
- <i class="fa fa-youtube-play youtube" aria-hidden="true"></i> [GitLab中的GraphQL:深度解析](../api_graphql_styleguide.md#deep-dive)(视频)由Nick Thomas制作
  - 概述GitLab中GraphQL的历史(非前端特定)
- <i class="fa fa-youtube-play youtube" aria-hidden="true"></i> [使用GraphQL和Vue Apollo实现GitLab功能演示](https://www.youtube.com/watch?v=6yYp2zB7FrM)(视频)由Natalia Tepluhina制作
  - 在GitLab中使用GraphQL实现前端功能的真实案例
- <i class="fa fa-youtube-play youtube" aria-hidden="true"></i> [GitLab客户端侧GraphQL的历史](https://www.youtube.com/watch?v=mCKRJxvMnf0)(视频)由Illya Klymov和Natalia Tepluhina制作
- <i class="fa fa-youtube-play youtube" aria-hidden="true"></i> [从Vuex到Apollo](https://www.youtube.com/watch?v=9knwu87IfU8)(视频)由Natalia Tepluhina制作
  - 概述何时Apollo可能是比Vuex更好的选择,以及如何进行过渡
- [🛠 Vuex -> Apollo迁移:一个概念验证项目](https://gitlab.com/ntepluhina/vuex-to-apollo/blob/master/README.md)
  - 展示Vue+GraphQL+(Vuex或Apollo)应用状态管理可能方法的示例集合

<!-- vale gitlab_base.Spelling = YES -->

### 库

我们在前端开发中使用[Apollo](https://www.apollographql.com/)(特别是[Apollo Client](https://www.apollographql.com/docs/react/))和[Vue Apollo](https://github.com/vuejs/vue-apollo)来处理GraphQL。

如果您在Vue应用中使用GraphQL,[在Vue中的使用](#usage-in-vue)部分可以帮助您学习如何集成Vue Apollo。

对于其他用例,请查看[在Vue外的使用](#usage-outside-of-vue)部分。

我们使用[Immer](https://immerjs.github.io/immer/)进行不可变缓存更新;有关更多信息,请参见[不可变性及缓存更新](#immutability-and-cache-updates)。

### 工具

<!-- vale gitlab_base.Spelling = NO -->

- [Apollo Client Devtools](https://github.com/apollographql/apollo-client-devtools)

<!-- vale gitlab_base.Spelling = YES -->

#### Apollo GraphQL VS Code扩展

如果您使用VS Code,[Apollo GraphQL扩展](https://marketplace.visualstudio.com/items?itemName=apollographql.vscode-apollo)支持`.graphql`文件中的自动补全。要设置GraphQL扩展,请按照以下步骤操作:

1. 生成schema:`bundle exec rake gitlab:graphql:schema:dump`
1. 在您的`gitlab`本地目录根目录添加一个`apollo.config.js`文件。
1. 用以下内容填充该文件:

   ```javascript
   module.exports = {
     client: {
       includes: ['./app/assets/javascripts/**/*.graphql', './ee/app/assets/javascripts/**/*.graphql'],
       service: {
         name: 'GitLab',
         localSchemaFile: './tmp/tests/graphql/gitlab_schema.graphql',
       },
     },
};- 重启VS Code。
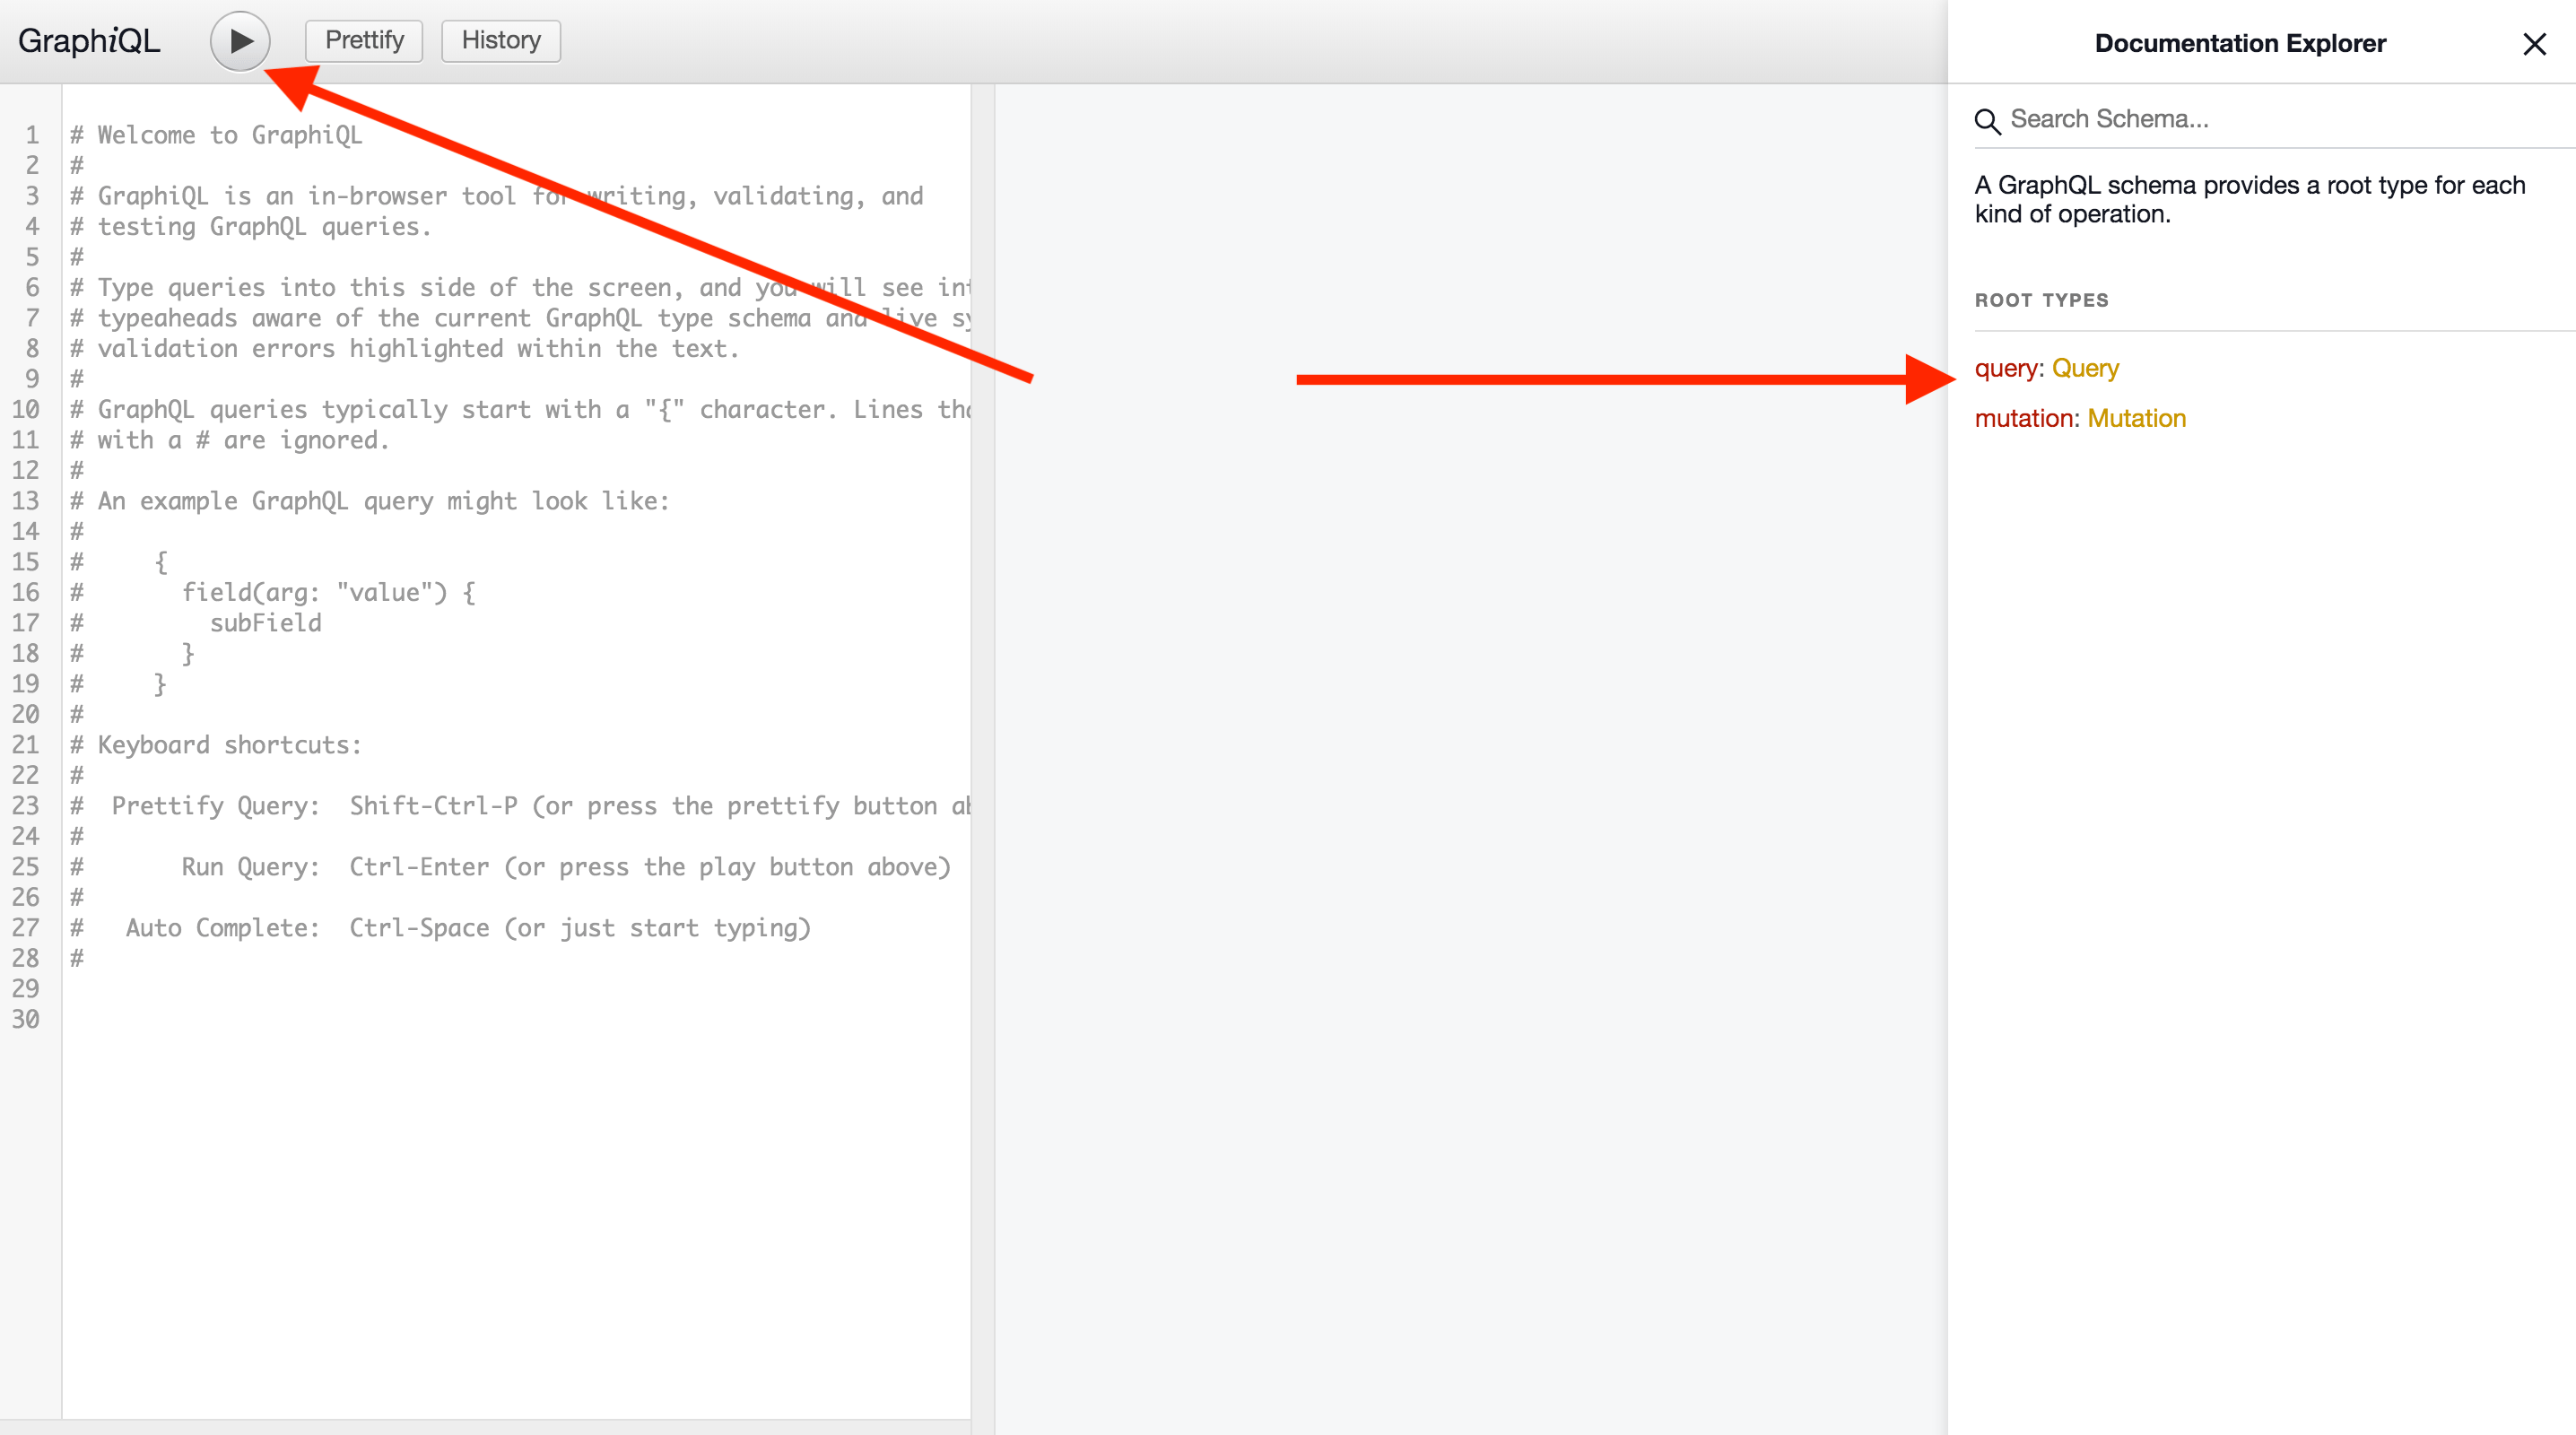
探索GraphQL API
我们的GraphQL API可以通过实例上的/-/graphql-explorer或在GitLab.com通过GraphiQL进行探索。如有需要,请查阅GitLab GraphQL API参考文档。
要检查所有现有的查询和变更,请在GraphiQL右侧选择文档浏览器。要检查您编写的查询和变更的执行情况,请在左上角选择执行查询。
## Apollo 客户端

为了避免在不同应用中重复创建客户端,我们提供了一个[默认客户端](https://gitlab.com/gitlab-org/gitlab/-/blob/master/app/assets/javascripts/lib/graphql.js),你应该使用它。它会正确配置 Apollo 客户端的 URL 并设置 CSRF 头部。

默认客户端接受两个参数:`resolvers` 和 `config`。

- `resolvers` 参数用于接收一个解析器对象,用于[本地状态管理](#local-state-with-apollo)的查询和突变。
- `config` 参数接收一个配置设置的对象:
  - `cacheConfig` 字段接受一个可选的设置对象,用于[自定义 Apollo 缓存](https://www.apollographql.com/docs/react/caching/cache-configuration/#configuring-the-cache)。
  - `baseUrl` 允许我们传递一个与主端点不同的 GraphQL 端点 URL(例如,`${gon.relative_url_root}/api/graphql`)。
  - `fetchPolicy` 决定组件如何与 Apollo 缓存交互。默认值为 "cache-first"。

### 同一对象的多个客户端查询

如果你对同一个 Apollo 客户端对象执行多次查询,可能会遇到以下错误:`当替换 Query 对象的 someProperty 字段时,缓存数据可能会丢失。要解决这个问题,请确保 SomeEntity 的所有对象都具有 id 或自定义合并函数`。我们已经检查了每个具有 `id` 的 GraphQL 类型是否存在 `id`,所以这种情况不应该发生(除非你在运行单元测试时看到此警告;在这种情况下,请确保你的模拟响应在请求时包含 `id`)。

当 `SomeEntity` 类型在 GraphQL 模式中没有 `id` 属性时,要修复此警告,我们需要定义一个自定义合并函数。

我们在默认客户端中将一些客户端范围的类型定义为 `merge: true` 作为 [`typePolicies`](https://gitlab.com/gitlab-org/gitlab/-/blob/master/app/assets/javascripts/lib/graphql.js)(这意味着在后续查询的情况下,Apollo 会将现有响应和新响应合并)。考虑在此处添加 `SomeEntity` 或为其定义自定义合并函数。

## GraphQL 查询

为了节省运行时的查询编译时间,webpack 可以直接导入 `.graphql` 文件。这让 webpack 能够在编译时预处理查询,而不是由客户端在运行时编译查询。

为了区分查询、突变和片段,建议采用以下命名约定:

- `all_users.query.graphql` 用于查询;
- `add_user.mutation.graphql` 用于突变;
- `basic_user.fragment.graphql` 用于片段。

如果你正在使用 [CustomersDot GraphQL 端点](https://gitlab.com/gitlab-org/gitlab/-/blob/be78ccd832fd40315c5e63bb48ee1596ae146f56/app/controllers/customers_dot/proxy_controller.rb) 的查询,文件名应以 `.customer.query.graphql`、`.customer.mutation.graphql` 或 `.customer.fragment.graphql` 结尾。

### 片段

[片段](https://graphql.org/learn/queries/#fragments) 是一种让复杂的 GraphQL 查询更具可读性和可重用性的方法。以下是 GraphQL 片段的示例:

```javascript
fragment DesignListItem on Design {
  id
  image
  event
  filename
  notesCount
}
片段可以存储在单独的文件中,导入并在查询、突变或其他片段中使用。
#import "./design_list.fragment.graphql"
#import "./diff_refs.fragment.graphql"

fragment DesignItem on Design {
  ...DesignListItem
  fullPath
  diffRefs {
    ...DesignDiffRefs
  }
}
更多关于片段的信息: GraphQL 文档
全局 ID
GitLab GraphQL API 将 id 字段表示为全局 ID,而不是 PostgreSQL 主键 id。全局 ID 是一种惯例,用于客户端库中的缓存和获取。
要将全局 ID 转换为原始主键 id,可以使用 getIdFromGraphQLId:
import { getIdFromGraphQLId } from '~/graphql_shared/utils';

const primaryKeyId = getIdFromGraphQLId(data.id);
必须 为 GraphQL 模式中具有 id 的每个类型查询全局 id:
query allReleases(...) {
  project(...) {
    id // Project 在 GraphQL 模式中有 ID,因此应获取它
    releases(...) {
      nodes {
        // Release 在 GraphQL 模式中没有 ID 属性
        name
        tagName
        tagPath
        assets {
          count
          links {
            nodes {
              id // Link 在 GraphQL 模式中有 ID,因此应获取它
              name
            }
          }
        }
      }
      pageInfo {
        // PageInfo 在 GraphQL 模式中没有 ID 属性
        startCursor
        hasPreviousPage
        hasNextPage
        endCursor
      }
    }
  }
}
使用异步变量的跳过查询
当一个查询有一个或多个变量需要另一个查询执行完成后才能运行时,至关重要的是在该查询的所有关系中添加一个 skip() 属性。
如果不这么做,会导致该查询执行两次:一次使用默认值(无论在 data 属性上定义的内容还是 undefined),然后在初始查询解析后再次执行,触发新变量值注入到智能查询中,随后由Apollo重新获取数据。
data() {
  return {
    // 为所有apollo查询定义数据属性
    project: null,
    issues: null
  }
},
apollo: {
  project: {
    query: getProject,
    variables() {
      return {
        projectId: this.projectId
      }
    }
  },
  releaseName: {
    query: getReleaseName,
    // 如果没有这个skip,查询会先以 `projectName: null` 运行一次
    // 然后在 `getProject` 解析后,会再次运行。
    skip() {
      return !this.project?.name
    },
    variables() {
      return {
        projectName: this.project?.name
      }
    }
  }
}
拆分GraphQL中的查询
在Apollo中拆分查询通常是为了通过将较大的单体查询分解为更小、更易管理的片段来优化数据获取。
为什么要在GraphQL中拆分查询
- 增加的查询复杂度 我们有限制,应该遵守GraphQL查询的限制。
- 性能 更小、更有针对性的查询通常能带来更快的服务器响应时间,这直接让前端受益,因为数据能更快到达客户端。
- 更好的组件解耦和维护性 每个组件可以处理自己的数据需求,这使得在整个应用中重用组件更容易,而不需要访问大型共享查询。
如何拆分查询
- 定义多个查询并在组件层次结构的各个部分独立使用它们。这样每个组件只获取它需要的数据。
如果你查看工作项查询架构,我们出于同样的查询复杂度和关注数据分离的原因,对大多数小部件进行了查询拆分。
#import "ee_else_ce/work_items/graphql/work_item_development.fragment.graphql"

query workItemDevelopment($id: WorkItemID!) {
  workItem(id: $id) {
    id
    iid
    namespace {
      id
    }
    widgets {
      ... on WorkItemWidgetDevelopment {
        ...WorkItemDevelopmentFragment
      }
    }
  }
}#import "~/graphql_shared/fragments/user.fragment.graphql"
query workItemParticipants($fullPath: ID!, $iid: String!) {
workspace: namespace(fullPath: $fullPath) {
id
workItem(iid: $iid) {
id
widgets {
... on WorkItemWidgetParticipants {
type
participants {
nodes {
...User
}
}
}
}
}
}
}- 条件查询使用
@include和@skip指令
Apollo支持使用这些指令进行条件查询,允许你根据组件的状态或其他条件拆分查询。
query projectWorkItems(
  $searchTerm: String
  $fullPath: ID!
  $types: [IssueType!]
  $in: [IssuableSearchableField!]
  $iid: String = null
  $searchByIid: Boolean = false
  $searchByText: Boolean = true
) {
  workspace: project(fullPath: $fullPath) {
    id
    workItems(search: $searchTerm, types: $types, in: $in) @include(if: $searchByText) {
      nodes {
        ...
      }
    }
    workItemsByIid: workItems(iid: $iid, types: $types) @include(if: $searchByIid) {
      nodes {
        ...
      }
    }
  }
}#import "../fragments/user.fragment.graphql"
#import "~/graphql_shared/fragments/user_availability.fragment.graphql"
query workspaceAutocompleteUsersSearch(
$search: String!
$fullPath: ID!
$isProject: Boolean = true
) {
groupWorkspace: group(fullPath: $fullPath) @skip(if: $isProject) {
id
users: autocompleteUsers(search: $search) {
...
}
}
workspace: project(fullPath: $fullPath) {
id
users: autocompleteUsers(search: $search) {
...
}
}
}注意 我们必须小心确保在拆分查询时不使现有的GraphQL查询失效。我们应该检查检查器,确保在拆分查询时不会多次调用相同的查询。
不可变性与缓存更新
从Apollo版本3.0.0开始,所有缓存更新都必须是不可变的。它需要被全新的已更新的对象完全替换。
为了简化更新缓存并返回新对象的过程,我们使用了Immer库。遵循以下约定:
- 更新的缓存命名为
data。 - 原始缓存数据命名为
sourceData。
典型的更新过程如下所示:
...
const sourceData = client.readQuery({ query });

const data = produce(sourceData, draftState => {
  draftState.commits.push(newCommit);
});

client.writeQuery({
  query,
  data,
});
...如代码示例所示,通过使用produce,我们可以对draftState执行任意类型的直接操作。此外,immer保证会生成一个包含对draftState修改的新状态。
在Vue中的使用
要使用Vue Apollo,需导入Vue Apollo插件以及默认客户端。这些应在Vue应用挂载时创建。
import Vue from 'vue';
import VueApollo from 'vue-apollo';
import createDefaultClient from '~/lib/graphql';
Vue.use(VueApollo);

const apolloProvider = new VueApollo({
  defaultClient: createDefaultClient(),
});

new Vue({
  ...,
  apolloProvider,
  ...
});可在Vue Apollo文档中了解更多关于Vue Apollo的信息。
使用Apollo管理本地状态
在创建默认客户端时,可以使用Apollo来管理应用程序状态。
使用客户端解析器
可通过设置默认客户端后向缓存写入数据来设置默认状态。在下面的示例中,我们使用带有@client Apollo指令的查询将初始数据写入Apollo缓存,然后在Vue组件中获取此状态:
// user.query.graphql

query User {
  user @client {
    name
    surname
    age
  }
}
// index.js
import Vue from 'vue';
import VueApollo from 'vue-apollo';
import createDefaultClient from '~/lib/graphql';
import userQuery from '~/user/user.query.graphql'
Vue.use(VueApollo);
const defaultClient = createDefaultClient();
defaultClient.cache.writeQuery({
query: userQuery,
data: {
user: {
name: 'John',
surname: 'Doe',
age: 30
},
},
});
const apolloProvider = new VueApollo({
defaultClient,
});// App.vue
import userQuery from '~/user/user.query.graphql'
export default {
apollo: {
user: {
query: userQuery
}
}
}除了使用writeQuery,还可以创建一个类型策略,该策略会在每次尝试从缓存读取userQuery时返回user:
const defaultClient = createDefaultClient({}, {
  cacheConfig: {
    typePolicies: {
      Query: {
        fields: {
          user: {
            read(data) {
              return data || {
                user: {
                  name: 'John',
                  surname: 'Doe',
                  age: 30
                },
              }
            }
          }
        }
      }
    }
  }
});除了创建本地数据,还可通过@client字段扩展现有的GraphQL类型。当我们需要为尚未添加到GraphQL API的字段模拟API响应时,这非常有帮助。
使用本地Apollo缓存模拟API响应
当我们有理由在本地模拟一些GraphQL API响应、查询或变更时(例如当它们尚未添加到实际API中),使用本地Apollo缓存很有帮助。
例如,我们在查询中使用了一个针对DesignVersion的片段:
fragment VersionListItem on DesignVersion {
  id
  sha
}我们还必须获取版本作者和created at属性以显示在版本下拉列表中。但这些更改尚未在我们的API中实现。我们可以修改现有片段,为新字段获取模拟响应:
fragment VersionListItem on DesignVersion {
  id
  sha
  author @client {
    avatarUrl
    name
  }
  createdAt @client
}现在Apollo会尝试为每个标记了@client指令的字段查找解析器。让我们为DesignVersion类型创建一个解析器(为什么是DesignVersion?因为我们的片段是在这个类型上创建的):
// resolvers.js

const resolvers = {
  DesignVersion: {
    author: () => ({
      avatarUrl:
        'https://www.gravatar.com/avatar/e64c7d89f26bd1972efa854d13d7dd61?s=80&d=identicon',
      name: 'Administrator',
      __typename: 'User',
    }),
    createdAt: () => '2019-11-13T16:08:11Z',
  },
};

export default resolvers;
我们需要将resolvers对象传递给现有的Apollo Client:
// graphql.js

import createDefaultClient from '~/lib/graphql';
import resolvers from './graphql/resolvers';

const defaultClient = createDefaultClient(resolvers);对于每次尝试获取版本的操作,客户端会从远程API端点获取id和sha。然后将我们的硬编码值分配给author和createdAt版本属性。有了这些数据,前端开发人员就可以在不被后端阻塞的情况下处理UI。当响应添加到API中时,我们的自定义本地解析器可以删除。对查询/片段的唯一更改是移除@client指令。
阅读更多关于Apollo本地状态管理的信息,请参阅Vue Apollo文档。
与Pinia一起使用
通常不建议在单个Vue应用中结合Pinia和Apollo。了解有关结合Apollo和Pinia的限制及场景。
与Vuex一起使用
我们不推荐结合Vuex和Apollo Client。Vuex已在GitLab中被弃用。
如果您有一个与Apollo一同使用的现有Vuex存储,我们强烈建议完全迁移出Vuex。了解更多关于GitLab状态管理的内容。
处理基于GraphQL的功能时前后端不同步的情况
任何需要创建或更新GraphQL查询/变更的功能都应仔细规划。前端和后端对应方应就满足客户端和服务器端要求的模式达成一致。这使两个部门能够开始实施各自的工作,而不会相互阻塞。
理想情况下,后端应在前端之前完成实施,以便客户端能立即通过最小化的跨部门往返来查询API。然而,我们认识到优先级并不总是对齐的。为了迭代并交付我们承诺的工作,可能有必要让前端先于后端实施。
前端先于后端实现查询和变更
在这种情况下,前端定义的GraphQL模式或字段可能还没有对应的后端解析器。只要实现正确进行了功能标记(使其不会转化为产品的公开错误),这是可以的。但我们确实会用graphql-verify CI作业验证客户端查询/变更是否符合后端GraphQL模式。如果您的更改要在后端实际支持之前合并,您必须确认其通过了验证。以下是几种可行的方法建议。
使用 @client 指令
首选方法是给任何新查询、mutation 或字段(后端尚未支持)添加 @client 指令。带有该指令的任何实体都会被 graphql-verify 验证任务跳过。
此外,Apollo 会尝试在客户端解析它们,这可以与 使用本地 Apollo 缓存模拟 API 响应 结合使用。这提供了一种便捷的方式,让你可以用客户端定义的假数据来测试功能。
当为你的更改提交合并请求时,提供一个本地解析器作为补丁是个好主意,这样评审者可以在他们的 GDK 中应用它,轻松地对你的工作进行冒烟测试。
确保通过后续问题或作为后端实施计划的一部分,跟踪该指令的移除。
向已知失败列表添加例外
可以通过将文件路径添加到 config/known_invalid_graphql_queries.yml 文件中,完全关闭特定文件的 GraphQL 查询/变更验证,这与通过 .eslintignore 文件禁用某些文件的 ESLint 类似。
请注意,此处的任何文件都不会被验证。因此,如果你只是在现有查询中添加字段,请使用 @client 指令方法,以便其余查询仍能被验证。
同样,确保这些覆盖项尽可能短暂,通过在适当的问题中跟踪其移除来实现。
功能标志控制的查询
在后端已完成而前端正在功能标志后实现的情况下,有几个选项可以利用 GraphQL 查询中的功能标志。
@include 指令
@include(或其相反的 @skip)可用于控制实体是否应包含在查询中。如果 @include 指令求值为 false,则不会调用实体的解析器,且该实体将从响应中排除。例如:
query getAuthorData($authorNameEnabled: Boolean = false) {
  username
  name @include(if: $authorNameEnabled)
}
然后在 Vue(或 JavaScript)中对查询的调用中,我们可以传入功能标志。此功能标志需要已正确设置。有关正确操作方式,请参阅 功能标志文档。
export default {
  apollo: {
    user: {
      query: QUERY_IMPORT,
      variables() {
        return {
          authorNameEnabled: gon?.features?.authorNameEnabled,
        };
      },
    }
  },
};
请注意,即使指令求值为 false,受保护的实体仍会发送到后端并与 GraphQL schema 匹配。因此,这种方法要求功能标志控制的实体存在于 schema 中,即使功能标志处于禁用状态。当功能标志关闭时,建议至少使用与前端相同的功能标志让解析器返回 null。请参阅 API GraphQL 指南。
不同版本的查询
另一种方法是复制标准查询,应避免这种情况。副本包含新实体,而原始查询保持不变。生产代码的责任是根据功能标志的状态触发正确的查询。例如:
export default {
  apollo: {
    user: {
      query() {
        return this.glFeatures.authorNameEnabled ? NEW_QUERY : ORIGINAL_QUERY,
      }
    }
  },
};
避免多个查询版本
多版本方法不推荐,因为它会导致更大的合并请求,并且需要在功能标志存在的整个期间维护两个相似的查询。仅在新的 GraphQL 实体尚未成为 schema 一部分,或它们在 schema 级别被功能标志控制(new_entity: :feature_flag)的情况下,可以使用多版本。
手动触发查询
组件的 apollo 属性上的查询会在组件创建时自动执行。有些组件希望按需发起网络请求,例如带有懒加载项的下拉列表。
有两种方法可以实现:
- 使用
skip属性
export default {
  apollo: {
    user: {
      query: QUERY_IMPORT,
      skip() {
        // 仅在下拉框打开时执行查询
        return !this.isOpen;
      },
    }
  },
};- 使用
addSmartQuery
你可以在方法中手动创建智能查询。
handleClick() {
  this.$apollo.addSmartQuery('user', {
    // 这里的值与你放在 `apollo` 部分中的一样
    query: QUERY_IMPORT,
  }),
};
使用分页
GitLab GraphQL API 对连接类型使用Relay风格游标分页。这意味着使用“游标”(cursor)来跟踪从数据集的哪个位置获取下一批项目。GraphQL Ruby 连接概念 是一个很好的概述和介绍。
每个连接类型(例如 DesignConnection 和 DiscussionConnection)都有一个 pageInfo 字段,其中包含分页所需的信息:
pageInfo {
  endCursor
  hasNextPage
  hasPreviousPage
  startCursor
}
在这里:
startCursor显示第一个项目的游标,endCursor显示最后一个项目的游标。hasPreviousPage和hasNextPage允许我们检查当前页面之前或之后是否还有更多页面。
当我们使用连接类型获取数据时,可以将游标作为 after 或 before 参数传递,表示分页的起始点或结束点。它们应跟随 first 或 last 参数,以指示在给定端点之后或之前我们要获取多少个项目。
例如,这里我们在某个游标后获取10个设计(让我们称之为 projectQuery):
#import "~/graphql_shared/fragments/page_info.fragment.graphql"

query {
  project(fullPath: "root/my-project") {
    id
    issue(iid: "42") {
      designCollection {
        designs(atVersion: null, after: "Ihwffmde0i", first: 10) {
          edges {
            node {
              id
            }
          }
          pageInfo {
            ...PageInfo
          }
        }
      }
    }
  }
}
注意,我们使用了 page_info.fragment.graphql 来填充 pageInfo 信息。
在组件中使用 fetchMore 方法
这种方法适用于用户处理的分页,例如滚动加载更多数据或明确点击“下一页”按钮时。当我们需要初始获取所有数据时,建议使用非智能查询代替。
进行初始获取时,通常希望从开头开始分页。在这种情况下,我们可以:
- 跳过传递游标。
- 明确向
after传递null。
获取数据后,我们可以使用 update 钩子作为机会自定义设置到Vue组件属性的数据。这使我们能够获取 pageInfo 对象以及其他数据。
在 result 钩子中,我们可以检查 pageInfo 对象,看看是否需要获取下一页。请注意,我们还保留了 requestCount 以确保应用程序不会无限期地请求下一页:
data() {
  return {
    pageInfo: null,
    requestCount: 0,
  }
},
apollo: {
  designs: {
    query: projectQuery,
    variables() {
      return {
        // ... 其余的设计变量
        first: 10,
      };
    },
    update(data) {
      const { id = null, issue = {} } = data.project || {};
      const { edges = [], pageInfo } = issue.designCollection?.designs || {};

      return {
        id,
        edges,
        pageInfo,
      };
    },
    result() {
      const { pageInfo } = this.designs;

      // 每次新结果增加请求计数
      this.requestCount += 1;
      // 只有当请求数量小于最大值且存在下一页时才获取下一页
      if (this.requestCount < MAX_REQUEST_COUNT && pageInfo?.hasNextPage) {
        this.fetchNextPage(pageInfo.endCursor);
      }
    },
  },
},
当我们想进入下一页时,使用Apollo的 fetchMore 方法,在那里传递新的游标(以及可选的新变量)。
fetchNextPage(endCursor) {
  this.$apollo.queries.designs.fetchMore({
    variables: {
      // ... 其余的设计变量
      first: 10,
      after: endCursor,
    },
  });
}
定义字段合并策略
我们还需要定义一个字段策略来指定如何将现有结果与传入的结果合并。例如,如果我们有 Previous/Next 按钮,用传入的结果替换现有结果是有意义的:
const apolloProvider = new VueApollo({
  defaultClient: createDefaultClient(
    {},
    {
      cacheConfig: {
        typePolicies: {
          DesignCollection: {
            fields: {
              designs: {
                merge(existing, incoming) {
                  if (!incoming) return existing;
                  if (!existing) return incoming;

                  // 我们只想保存传入的节点并替换现有的节点
                  return incoming
                }
              }
            }
          }
        }
      }
    },
  ),
});
当我们有无限滚动时,将传入的 designs 节点添加到现有节点而不是替换它们会更合理。此时,merge 函数会略有不同:
const apolloProvider = new VueApollo({
  defaultClient: createDefaultClient(
    {},
    {
      cacheConfig: {
        typePolicies: {
          DesignCollection: {
            fields: {
              designs: {
                merge(existing, incoming) {
                  if (!incoming) return existing;
                  if (!existing) return incoming;

                  const { nodes, ...rest } = incoming;
                  // 我们只需要合并 nodes 数组。
                  // 其余字段(分页信息)应始终由传入结果覆盖
                  let result = rest;
                  result.nodes = [...existing.nodes, ...nodes];
                  return result;
                }
              }
            }
          }
        }
      }
    },
  ),
});
apollo-client 提供了一些用于分页查询的字段策略。以下是使用 concatPagination 策略实现无限滚动分页的另一种方式:
import { concatPagination } from '@apollo/client/utilities';
import Vue from 'vue';
import VueApollo from 'vue-apollo';
import createDefaultClient from '~/lib/graphql';

Vue.use(VueApollo);

export default new VueApollo({
  defaultClient: createDefaultClient(
    {},
    {
      cacheConfig: {
        typePolicies: {
          Project: {
            fields: {
              dastSiteProfiles: {
                keyArgs: ['fullPath'], // 你可能需要设置 keyArgs 选项以确保缓存的完整性
              },
            },
          },
          DastSiteProfileConnection: {
            fields: {
              nodes: concatPagination(),
            },
          },
        }
      }
    },
  ),
});
这与上面的 DesignCollection 示例类似,因为新页面的结果会被追加到之前的页面。
对于某些情况,很难为字段定义正确的 keyArgs,因为所有字段都会被更新。在这种情况下,我们可以将 keyArgs 设置为 false。这会指示 Apollo Client 不执行任何自动合并,完全依赖我们在 merge 函数中编写的逻辑。
例如,我们有这样一个查询:
query searchGroupsWhereUserCanTransfer {
  currentUser {
    id
    groups(after: 'somecursor') {
      nodes {
        id
        fullName
      }
      pageInfo {
        ...PageInfo
      }
    }
  }
}
这里的 groups 字段没有合适的 keyArgs 候选:我们不希望考虑 after 参数,因为它在请求后续页面时会变化。将 keyArgs 设置为 false 可以让更新按预期工作:
typePolicies: {
  UserCore: {
    fields: {
      groups: {
        keyArgs: false,
      },
    },
  },
  GroupConnection: {
    fields: {
      nodes: concatPagination(),
    },
  },
}
在组件中使用递归查询
当需要初始获取所有分页数据时,Apollo 查询可以帮我们实现。如果我们需要根据用户交互来获取下一页数据,建议使用 smartQuery 结合 fetchMore 钩子。
当查询解析后,我们可以更新组件数据并检查 pageInfo 对象。这让我们能够判断是否需要获取下一页,从而递归调用该方法。
注意我们也维护了一个 requestCount 来确保应用不会无限地请求下一页。
data() {
  return {
    requestCount: 0,
    isLoading: false,
    designs: {
      edges: [],
      pageInfo: null,
    },
  }
},
created() {
  this.fetchDesigns();
},
methods: {
  handleError(error) {
    this.isLoading = false;
    // 处理 `error`\n  },
  fetchDesigns(endCursor) {
    this.isLoading = true;

    return this.$apollo
      .query({
        query: projectQuery,
        variables() {
          return {
            // ... 其他设计变量\n            first: 10,
            endCursor,
          };
        },
      })
      .then(({ data }) => {
        const { id = null, issue = {} } = data.project || {};
        const { edges = [], pageInfo } = issue.designCollection?.designs || {};

        // 更新数据
        this.designs = {
          id,
          edges: [...this.designs.edges, ...edges],
          pageInfo: pageInfo,
        };

        // 每次新结果增加请求计数
        this.requestCount += 1;
        // 只有在还有更多请求且存在下一页时才获取下一页
        if (this.requestCount < MAX_REQUEST_COUNT && pageInfo?.hasNextPage) {
          this.fetchDesigns(pageInfo.endCursor);
        } else {
          this.isLoading = false;
        }
      })
      .catch(this.handleError);
  },
},
分页与乐观更新
当 Apollo 在客户端缓存分页数据时,它会在缓存键中包含 pageInfo 变量。如果你想乐观地更新这些数据,在与缓存交互时(通过 .readQuery() 或 .writeQuery()),你必须提供 pageInfo 变量。这可能很繁琐且不符合直觉。
为了更容易处理缓存的分页查询,Apollo 提供了 @connection 指令。该指令接受一个 key 参数,用作缓存数据时的静态键。然后你就可以在不提供任何特定分页变量的情况下检索数据。
这是一个使用 @connection 指令的查询示例:
#import "~/graphql_shared/fragments/page_info.fragment.graphql"

query DastSiteProfiles($fullPath: ID!, $after: String, $before: String, $first: Int, $last: Int) {
  project(fullPath: $fullPath) {
    siteProfiles: dastSiteProfiles(after: $after, before: $before, first: $first, last: $last)
      @connection(key: "dastSiteProfiles") {
      pageInfo {
        ...PageInfo
      }
      edges {
        cursor
        node {
          id
          # ...\n        }
      }
    }
  }
}
在这个例子中,Apollo 使用稳定的 dastSiteProfiles 缓存键存储数据。
要从缓存中检索这些数据,你只需要提供 $fullPath 变量,省略像 after 或 before 这样的特定分页变量:
const data = store.readQuery({
  query: dastSiteProfilesQuery,
  variables: {
    fullPath: \'namespace/project\',\n  },
});
阅读更多关于 @connection 指令的信息,请参阅 Apollo 文档。
批量相似查询
默认情况下,Apollo 客户端会为每个查询从浏览器发送一个 HTTP 请求。你可以选择在单个出站请求中批量多个查询,并通过定义一个 batchKey 来减少请求数量。
当同一个组件多次调用查询但只想一次更新 UI 时,这很有帮助。在此示例中,我们使用组件名作为键:
export default {
  name: \'MyComponent\'
  apollo: {
    user: {
      query: QUERY_IMPORT,
      context: {
        batchKey: \'MyComponent\',\n      },
    }
  },
};
批处理键可以是组件的名称。
轮询与性能
虽然Apollo客户端支持简单的轮询,但出于性能考虑,我们更倾向于使用基于ETag的缓存,而不是每次都访问数据库。
在后端设置好ETag资源进行缓存后,前端需要进行一些更改。
首先,从后端获取你的ETag资源,它应该是一个URL路径的形式。在流水线图表的示例中,这被称为graphql_resource_etag,用于创建新的头部信息添加到Apollo上下文中:
/* pipelines/components/graph/utils.js */

/* eslint-disable @gitlab/require-i18n-strings */
const getQueryHeaders = (etagResource) => {
  return {
    fetchOptions: {
      method: 'GET',
    },
    headers: {
      /* 这取决于你的功能 */
      'X-GITLAB-GRAPHQL-FEATURE-CORRELATION': 'verify/ci/pipeline-graph',
      'X-GITLAB-GRAPHQL-RESOURCE-ETAG': etagResource,
      'X-REQUESTED-WITH': 'XMLHttpRequest',
    },
  };
};
/* eslint-enable @gitlab/require-i18n-strings */

/* component.vue */

apollo: {
  pipeline: {
    context() {
      return getQueryHeaders(this.graphqlResourceEtag);
    },
    query: getPipelineDetails,
    pollInterval: 10000,
    ..
  },
},在这里,Apollo查询正在监视graphqlResourceEtag的变化。如果你的ETag资源动态变化,你应该确保发送到查询头部的资源也得到更新。为此,你可以在本地缓存中存储并动态更新ETag资源。
你可以在流水线编辑器的流水线状态中看到这个示例。流水线编辑器监视最新流水线的变化。当用户创建新提交时,我们会更新流水线查询以轮询新流水线的变化。
# pipeline_etag.query.graphql

query getPipelineEtag {
  pipelineEtag @client
}
/* pipeline_editor/components/header/pipeline_editor_header.vue */
import getPipelineEtag from '~/ci/pipeline_editor/graphql/queries/client/pipeline_etag.query.graphql';
apollo: {
pipelineEtag: {
query: getPipelineEtag,
},
pipeline: {
context() {
return getQueryHeaders(this.pipelineEtag);
},
query: getPipelineIidQuery,
pollInterval: PIPELINE_POLL_INTERVAL,
},
}
/* pipeline_editor/components/commit/commit_section.vue */
await this.$apollo.mutate({
mutation: commitCIFile,
update(store, { data }) {
const pipelineEtag = data?.commitCreate?.commit?.commitPipelinePath;
if (pipelineEtag) {
store.writeQuery({ query: getPipelineEtag, data: { pipelineEtag } });
}
},
});最后,我们可以添加一个可见性检查,使组件在浏览器标签页不活跃时暂停轮询。这样可以减少页面上的请求负载。
/* component.vue */

import { toggleQueryPollingByVisibility } from '~/pipelines/components/graph/utils';

export default {
  mounted() {
    toggleQueryPollingByVisibility(this.$apollo.queries.pipeline, POLL_INTERVAL);
  },
};你可以使用this MR作为在前端完全实现ETag缓存的参考。
一旦订阅成熟,这个过程可以被替换为使用它们,我们可以移除单独的链接库并返回到批量查询。
如何测试ETag缓存
你可以通过检查网络选项卡中的请求来测试你的实现是否有效。如果ETag资源没有变化,所有轮询请求应满足以下条件:
- 是
GET请求而非POST请求。 - 有HTTP状态码
304而非200。
测试时要确保开发工具中没有禁用缓存。
如果你使用Chrome且一直看到200HTTP状态码,可能是这个bug:开发者工具显示200而非304。在这种情况下,检查响应头部的源以确认请求确实被缓存并返回了304状态码。
订阅
我们使用subscriptions通过WebSockets从GraphQL API接收实时更新。目前现有的订阅数量有限,你可以在GraphqiQL explorer中查看可用列表。
有关订阅的综合介绍,请参阅实时小组件开发者指南。
最佳实践
何时使用(以及不使用)mutations中的update钩子
Apollo Client的.mutate()方法提供了一个update钩子,该钩子在mutation生命周期中被调用两次:
- 一次在开始时,也就是在mutation完成之前。
- 一次在mutation完成后。
仅当你从store(即ApolloCache)中添加或删除项目时才应使用此钩子。如果你正在更新现有项目,它通常由全局id表示。
在这种情况下,mutation查询定义中存在此id会使store自动更新。以下是包含id的典型mutation查询示例:
mutation issueSetWeight($input: IssueSetWeightInput!) {
  issuableSetWeight: issueSetWeight(input: $input) {
    issuable: issue {
      id
      weight
    }
    errors
  }
}
测试
生成GraphQL模式
我们的一些测试会加载schema JSON文件。要生成这些文件,请运行:
bundle exec rake gitlab:graphql:schema:dump你应在从上游拉取后或变基分支时运行此任务。这会作为gdk update的一部分自动运行。
如果你使用RubyMine IDE,并且已将tmp目录标记为“排除”,则应为gitlab/tmp/tests/graphql执行“标记目录为->未排除”。这将允许JS GraphQL插件自动查找和索引模式。
模拟 Apollo 客户端
为了测试包含 Apollo 操作的组件,我们需要在单元测试中模拟一个 Apollo 客户端。我们使用 mock-apollo-client 库来模拟 Apollo 客户端,并使用我们在此基础上创建的 createMockApollo 助手函数。
我们需要通过调用 Vue.use(VueApollo) 将 VueApollo 注入到 Vue 实例中。这将为文件中的所有测试全局安装 VueApollo。建议在导入之后立即调用 Vue.use(VueApollo)。
import VueApollo from 'vue-apollo';
import Vue from 'vue';

Vue.use(VueApollo);

describe('带有 Apollo 模拟的某个组件', () => {
  let wrapper;

  function createComponent(options = {}) {
    wrapper = shallowMount(...);
  }
})
之后,我们需要创建一个模拟的 Apollo 提供者:
import createMockApollo from 'helpers/mock_apollo_helper';

describe('带有 Apollo 模拟的某个组件', () => {
  let wrapper;
  let mockApollo;

  function createComponent(options = {}) {
    mockApollo = createMockApollo(...)

    wrapper = shallowMount(SomeComponent, {
      apolloProvider: mockApollo
    });
  }

  afterEach(() => {
    // 我们需要确保测试之间不会残留提供者
    mockApollo = null
  })
})
现在,我们需要为每个查询或变更定义一组 handlers。Handlers 应该是模拟函数,返回正确的查询响应或错误:
import getDesignListQuery from '~/design_management/graphql/queries/get_design_list.query.graphql';
import permissionsQuery from '~/design_management/graphql/queries/design_permissions.query.graphql';
import moveDesignMutation from '~/design_management/graphql/mutations/move_design.mutation.graphql';

describe('带有 Apollo 模拟的某个组件', () => {
  let wrapper;
  let mockApollo;

  function createComponent(options = {
    designListHandler: jest.fn().mockResolvedValue(designListQueryResponse)
  }) {
    mockApollo = createMockApollo([
       [getDesignListQuery, options.designListHandler],
       [permissionsQuery, jest.fn().mockResolvedValue(permissionsQueryResponse)],
       [moveDesignMutation, jest.fn().mockResolvedValue(moveDesignMutationResponse)],
    ])

    wrapper = shallowMount(SomeComponent, {
      apolloProvider: mockApollo
    });
  }
})
当模拟已解析值时,请确保响应的结构与实际 API 响应相同。例如,根属性应为 data:
const designListQueryResponse = {
  data: {
    project: {
      id: '1',
      issue: {
        id: 'issue-1',
        designCollection: {
          copyState: 'READY',
          designs: {
            nodes: [
              {
                id: '3',
                event: 'NONE',
                filename: 'fox_3.jpg',
                notesCount: 1,
                image: 'image-3',
                imageV432x230: 'image-3',
                currentUserTodos: {
                  nodes: [],
                },
              },
            ],
          },
          versions: {
            nodes: [],
          },
        },
      },
    },
  },
};
测试查询时,请注意它们是 Promise,因此需要 resolve 才能渲染结果。如果不 resolve,我们可以检查查询的 loading 状态:
it('渲染加载状态', () => {
  const wrapper = createComponent();

  expect(wrapper.findComponent(LoadingSpinner).exists()).toBe(true)
});

it('渲染设计列表', async () => {
  const wrapper = createComponent();

  await waitForPromises()

  expect(findDesigns()).toHaveLength(3);
});
如果需要测试查询错误,我们需要将拒绝值作为请求处理器进行模拟:
it('查询失败时显示错误', async () => {
  const wrapper = createComponent({
    designListHandler: jest.fn().mockRejectedValue('Houston, we have a problem!')
  });

  await waitForPromises()

  expect(wrapper.find('.test-error').exists()).toBe(true)
})
变更也可以以同样的方式测试:
  const moveDesignHandlerSuccess = jest.fn().mockResolvedValue(moveDesignMutationResponse)

  function createComponent(options = {
    designListHandler: jest.fn().mockResolvedValue(designListQueryResponse),
    moveDesignHandler: moveDesignHandlerSuccess
  }) {
    mockApollo = createMockApollo([
       [getDesignListQuery, options.designListHandler],
       [permissionsQuery, jest.fn().mockResolvedValue(permissionsQueryResponse)],
       [moveDesignMutation, moveDesignHandler],
    ])

    wrapper = shallowMount(SomeComponent, {
      apolloProvider: mockApollo
    });
  }

it('使用正确参数调用变更并重新排序设计', async () => {
  const wrapper = createComponent();

  wrapper.find(VueDraggable).vm.$emit('change', {
    moved: {
      newIndex: 0,
      element: designToMove,
为了模拟多种查询响应状态(成功和失败),Apollo Client 的内置重试行为可以与 Jest 的模拟函数结合,生成一系列响应。这些响应不需要手动推进,但需要以特定方式等待。
describe('当查询超时时', () => {
  const advanceApolloTimers = async () => {
    jest.runOnlyPendingTimers();
    await waitForPromises()
  };

  beforeEach(async () => {
    const failSucceedFail = jest
      .fn()
      .mockResolvedValueOnce({ errors: [{ message: 'timeout' }] })
      .mockResolvedValueOnce(mockPipelineResponse)
      .mockResolvedValueOnce({ errors: [{ message: 'timeout' }] });

    createComponentWithApollo(failSucceedFail);
    await waitForPromises();
  });

  it('显示正确的错误,并且在数据为空时不覆盖已填充的数据', async () => {
    /* 首次失败,显示错误,尚未有数据 */
    expect(getAlert().exists()).toBe(true);
    expect(getGraph().exists()).toBe(false);

    /* 成功,清除错误,显示图表 */
    await advanceApolloTimers();
    expect(getAlert().exists()).toBe(false);
    expect(getGraph().exists()).toBe(true);

    /* 再次失败,警报返回但数据仍保留 */
    await advanceApolloTimers();
    expect(getAlert().exists()).toBe(true);
    expect(getGraph().exists()).toBe(true);
  });
});
以前,我们使用 mount 上的 { mocks: { $apollo ...}} 来测试 Apollo 功能。这种方法不被推荐——正确的 $apollo 模拟会向测试泄露大量实现细节。考虑用模拟的 Apollo 提供者替换它。
wrapper = mount(SomeComponent, {
  mocks: {
    // 避免!应模拟真实的 GraphQL 查询和变更,而非此方式
    $apollo: {
      mutate: jest.fn(),
      queries: {
        groups: {
          loading,
        },
      },
    },
  },
});
测试订阅
在测试订阅时,请注意 vue-apollo@4 中订阅的默认行为是在出错时重新订阅并立即发出新请求(除非 skip 的值限制了我们这样做)
import waitForPromises from 'helpers/wait_for_promises';

// subscriptionMock 在我们的辅助函数中注册为订阅的处理函数
const subcriptionMock = jest.fn().mockResolvedValue(okResponse);

// ...

it('测试错误状态', () => {
  // 避免:会卡在这里!
  subscriptionMock = jest.fn().mockRejectedValue({ errors: [] });

  // 组件作为一部分调用 subscription mock
  createComponent();
  // 会永远卡住:
  // * 被拒绝的 Promise 将触发重新订阅
  // * 重新订阅将再次调用 subscriptionMock,导致被拒绝的 Promise
  // * 被拒绝的 Promise 将触发下一次重新订阅,
  await waitForPromises();
  // ...
})
为避免在使用 vue@3 和 vue-apollo@4 时出现此类无限循环,请考虑使用一次性拒绝
it('测试失败', () => {
  // 好:订阅将仅失败一次
  subscriptionMock.mockRejectedValueOnce({ errors: [] });
  // 组件作为一部分调用 subscription mock
  createComponent();
  await waitForPromises();

  // 下面的代码现在将被执行
})
测试 @client 查询
使用模拟解析器
如果你的应用包含 @client 查询,当你仅传递处理函数时会收到以下 Apollo Client 警告:
出现以下console.warn()的意外调用:
警告:mock-apollo-client - 该查询完全在客户端(使用 @client 指令),并且已配置解析器。请求处理程序不会被调用。
要修复此问题,你应该定义模拟 resolvers 而不是模拟 handlers。例如,给定以下 @client 查询:
query getBlobContent($path: String, $ref: String!) {
  blobContent(path: $path, ref: $ref) @client {
    rawData
  }
}
及其实际的客户端解析器:
import Api from '~/api';

export const resolvers = {
  Query: {
    blobContent(_, { path, ref }) {
      return {
        __typename: 'BlobContent',
        rawData: Api.getRawFile(path, { ref }).then(({ data }) => {
          return data;
        }),
      };
    },
  },
};

export default resolvers;我们可以使用返回相同形状数据的模拟解析器,同时用模拟函数模拟结果:
let mockApollo;
let mockBlobContentData; // 模拟函数,jest.fn();

const mockResolvers = {
  Query: {
    blobContent() {
      return {
        __typename: 'BlobContent',
        rawData: mockBlobContentData(), // 模拟函数可以解析模拟数据
      };
    },
  },
};

const createComponentWithApollo = ({ props = {} } = {}) => {
  mockApollo = createMockApollo([], mockResolvers); // 解析器是第二个参数

  wrapper = shallowMount(MyComponent, {
    propsData: {},
    apolloProvider: mockApollo,
    // ...
  })
};
之后,你可以解析或拒绝所需的值。
beforeEach(() => {
  mockBlobContentData = jest.fn();
});

it('显示数据', async() => {
  mockBlobContentData.mockResolvedValue(data); // 你可以解析或拒绝来模拟结果

  createComponentWithApollo();

  await waitForPromises(); // 等待解析器模拟执行

  expect(findContent().text()).toBe(mockCiYml);
});
使用 cache.writeQuery
\n有时我们想测试本地查询的 result 钩子。为了触发它,我们需要用正确的数据填充缓存,以便通过此查询获取:\n\njavascript\nquery fetchLocalUser {\n fetchLocalUser @client {\n name\n }\n}\n\n\njavascript\nimport fetchLocalUserQuery from \'~/design_management/graphql/queries/fetch_local_user.query.graphql\';\n\ndescribe(\'Some component with Apollo mock\', () => {\n let wrapper;\n let mockApollo;\n\n function createComponent(options = {\n designListHandler: jest.fn().mockResolvedValue(designListQueryResponse)\n }) {\n mockApollo = createMockApollo([...])\n mockApollo.clients.defaultClient.cache.writeQuery({\n query: fetchLocalUserQuery,\n data: {\n fetchLocalUser: {\n __typename: \'User\',\n name: \'Test\',\n },\n },\n });\n\n wrapper = shallowMount(SomeComponent, {\n apolloProvider: mockApollo\n });\n }\n})\n\n\n当您需要配置模拟的 Apollo 客户端的缓存行为时,在创建模拟客户端实例时提供额外的缓存选项,提供的选项将与默认缓存选项合并:\n\njavascript\nconst defaultCacheOptions = {\n fragmentMatcher: { match: () => true },\n addTypename: false,\n};\n\n\njavascript\nmockApollo = createMockApollo(\n requestHandlers,\n {},\n {\n dataIdFromObject: (object) =>\n // eslint-disable-next-line no-underscore-dangle\n object.__typename === \'Requirement\' ? object.iid : defaultDataIdFromObject(object),\n },\n);\n\n\n## 处理错误\n\nGitLab GraphQL 变更有两个不同的错误模式:顶级错误 和 作为数据的错误。\n\n使用 GraphQL 变更时,请考虑处理这两种错误模式,以确保用户在发生错误时收到适当的反馈。\n\n### 顶级错误\n\n这些错误位于 GraphQL 响应的“顶层”。这些是不可恢复的错误,包括参数错误和语法错误,不应直接呈现给用户。\n\n#### 处理顶级错误\n\nApollo 了解顶级错误,因此我们可以利用 Apollo 的各种错误处理机制来处理这些错误。例如,调用 mutate 方法后处理 Promise 拒绝,或处理从 ApolloMutation 组件发出的 error 事件。\n\n因为这些错误不是为用户设计的,所以顶级错误的错误消息应在客户端定义。\n\n### 作为数据的错误\n\n这些错误嵌套在 GraphQL 响应的 data 对象中。这些是可恢复的错误,理想情况下可以直接呈现给用户。\n\n#### 处理作为数据的错误\n\n首先,我们必须向变更对象添加 errors:\n\ndiff\nmutation createNoteMutation($input: String!) {\n createNoteMutation(input: $input) {\n note {\n id\n+ errors\n }\n }\n\n\n现在,当我们提交这个变更并且发生错误时,响应会包含供我们处理的 errors:\n\njavascript\n{\n data: {\n mutationName: {\n errors: ["Sorry, we were not able to update the note."]\n }\n }\n}\n\n\n处理作为数据的错误时,请运用您的最佳判断来确定是将响应中的错误消息还是另一个客户端定义的消息呈现给用户。\n\n## 在 Vue 外部使用\n\n也可以在 Vue 外部使用 GraphQL,方法是直接导入并使用带有查询的默认客户端。\n\njavascript\nimport createDefaultClient from \'~/lib/graphql\';\nimport query from \'./query.graphql\';\n\nconst defaultClient = createDefaultClient();\n\ndefaultClient.query({ query })\n .then(result => console.log(result));\n\n\n当使用 Vuex 时,请在以下情况禁用缓存:\n- 数据已在其他地方被缓存\n- 用例不需要缓存(如果数据已在其他地方被缓存,或者给定用例不需要缓存)\n\njavascript\nimport createDefaultClient, { fetchPolicies } from \'~/lib/graphql\';\n\nconst defaultClient = createDefaultClient(\n {},\n {\n fetchPolicy: fetchPolicies.NO_CACHE,\n },\n);\n
## 通过GraphQL启动调用提前执行初始查询

为了提升性能,有时我们希望尽早发起初始GraphQL查询。为此,可通过以下步骤将其添加到**启动调用**中:

- 将应用中所需的所有初始查询移至 `app/graphql/queries`;
- 为每个嵌套查询层级添加 `__typename` 属性:

  ```javascript
  query getPermissions($projectPath: ID!) {
    project(fullPath: $projectPath) {
      __typename
      userPermissions {
        __typename
        pushCode
        forkProject
        createMergeRequestIn
      }
    }
}-
如果查询包含片段,需将片段直接移至查询文件内而非导入:
fragment PageInfo on PageInfo { __typename hasNextPage hasPreviousPage startCursor endCursor } query getFiles( $projectPath: ID! $path: String $ref: String! ) { project(fullPath: $projectPath) { __typename repository { __typename tree(path: $path, ref: $ref) { __typename pageInfo { ...PageInfo } } } } } } -
若片段仅使用一次,也可完全移除该片段:
query getFiles( $projectPath: ID! $path: String $ref: String! ) { project(fullPath: $projectPath) { __typename repository { __typename tree(path: $path, ref: $ref) { __typename pageInfo { __typename hasNextPage hasPreviousPage startCursor endCursor } } } } } } -
在作为应用视图的HAML文件中添加带正确变量的启动调用。要添加GraphQL启动调用,我们使用
add_page_startup_graphql_call助手函数,其中第一个参数是查询路径,第二个参数是包含查询变量的对象。查询路径相对于app/graphql/queries文件夹:例如,若需要app/graphql/queries/repository/files.query.graphql查询,则路径为repository/files。
故障排查
模拟客户端返回空对象而非模拟响应
如果你的单元测试因响应包含空对象而非模拟数据而失败,请向模拟响应中添加 __typename 字段。
或者,GraphQL查询fixture会在生成时自动为你添加 __typename。
关于丢失缓存数据的警告
有时你可能在控制台看到警告:Cache data may be lost when replacing the someProperty field of a Query object. To address this problem, either ensure all objects of SomeEntity have an id or a custom merge function。请查看多查询章节解决问题。
- current_route_path = request.fullpath.match(/-\/tree\/[^\/]+\/(.+$)/).to_a[1]
- add_page_startup_graphql_call('repository/path_last_commit', { projectPath: @project.full_path, ref: current_ref, path: current_route_path || "" })
- add_page_startup_graphql_call('repository/permissions', { projectPath: @project.full_path })
- add_page_startup_graphql_call('repository/files', { nextPageCursor: "", pageSize: 100, projectPath: @project.full_path, ref: current_ref, path: current_route_path || "/"})